DIY Movie Masters BatmanBy GeekSummit
So I've done several Christopher Reeve Movie masters and even done a few tutorials on how I come about my figures but this time lets switch focus over to the #2 (IMO) Superhero Movie pioneer of all time, Michael Keaton's Batman. Plenty can be said for 1989's re-imagination of the classic character, but this look definitely has some major staying power. I've always loved the first 2 of the Batman movies, and I think plenty of people share in my renouncement of the following 3 movies. But let's not get caught up in bat-nipples and batskates. Let's celebrate what good came from it. The inspiration for this model. Michael Keaton Batman III. Here I'll give you a quick run through on the parts and techniques used to create this figure. Get out there and try for yourself. Make me proud!!!
Let's Introduce our Players: First we have the very face of the the figure quite literally, a bubble gum container from back in the good old days. This has a pretty nice Keaton likeness as it should as well as a perfect belt made in separately molded plastic. These two pieces alone make this figure what it is. I work in multiples so I actually make a cast of the belt as well as the head.
The base figure that we use is the Movie Masters Bruce Wayne in prototype suit,. There is not bat on the chest which is a nice start as well as the armor is very sleek and makes a nice accommodation to the Keaton Suit once we do some sculpting. The straps and belts and everything will come off. There is a "knot" in the back where everything comes together, along with a precision cutting of the belt in the back. These two moves will release the entire harness off very easily and keep it intact for any other uses.

We will now get on to some simple modifications, adding armor to our stock suit. I go after the gauntlets first just since they are very simple. I take a ball of mixed Apoxie Sculpt and make two smaller sections and flatten them inplace on the forearms of the figure. I try to make them wide enough to cover half the forearm (TOP) and then make my indentions and then trim to a smooth shape. Then I follow with two small tabs on the backs of the hands and then cut to shape and add my seams for that "sporty leather" look. Also we need to add our shin guards and chest armor. These are a little trickier.
I lock the abcruncher joint with a dab of hot glue in the backside of the joint. That keeps things in place while I sculpt. Its easily removable when ready and shouldn't affect any other part of the figure. With everything locked in place I'm able to sculpt the entire abdomen as one piece. I'm still aware of the separation of the two pieces of plastic but I don't have to worry about them as much. I smooth on a layer of apoxie and get to sculpting.
I've found that while sculpting muscle a couple of tricks come in handy. I work with dry Apoxie to get my area covered but always come back with water to soften edges and such. BUT while making the indentions for muscles like the 6 pack here, I use a sheet of plastic like a Ziplock bag (nice and durable) and use it as a tension layer over the top. This makes your tool marks less intense and leaves a nice rounded edge. That way you don't have to go back and smooth over with a dremmel or other burnishing tools.
The Shin Guards are done as one solid layer of Apoxie. Nearly just as I do the gauntlets I use the same approach on the shingurads. First I start with a ball of mixed Apoxie, separate into two even balls and then dry apply them directly to the shins. I push it around to cover the fronts of both shins and then cut it into shape. (make sure to leave the top edge pointed in the middle). I smooth it over with water with my forefinger and thumb to make a nice sharp frontmost edge. I go ahead and segment the armor plates but I don't go all the way to defining them, I do that once the apoxie is dried. That way i can actually use my exacto to carve the apoxie to shape. This makes for VERY nice tight lines and clean edges... a very UNsculpted look.

With nearly the whole figure assembled at this point I am left only with creating the belt. For this I use that cheaper simpler Mold Making Putty which is like $12 @ Hobby Lobby. This lets you make a quick mold of an object when you don't want to build up to the whole 24+ hour letdown of pouring a bad silicone mold.
Anyway. I take the original belt form the bubble gum container and separate it from the black plastic (not always easy) and I fit it to the intended figure in place. Now I take my Mold Making Putty and simply surround that area with it to make a form fitting mold that accounts for the piece to be cast as well as its placement on the figure. You'll see this mold accounts for the groin and legs so nothing moves while casting. just mix a tiny amount of resin and pour into the mold and place your figure in the mold as well to bond the two pieces. (takes about 5 minutes) There may be a little cleanup from overflow but it usually chips off pretty easily.


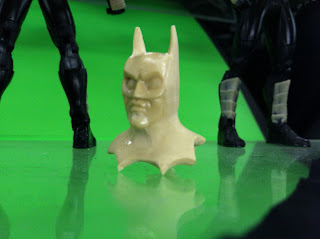
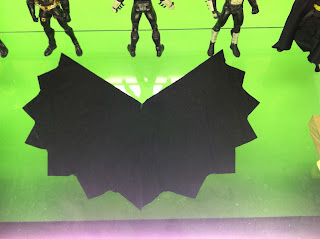
For the head since it needs to fit to another body I actually take the head and sculpt and smooth the cowl base onto the intended figure. The only problem is we need to put our fabric underneath that cowl eventually so my process has evolved a little to account for that necessity. This process still takes one sacrificial figure but it is SO worth it to me since I like to revisit projects and try new things. This head is actually cast in a similar fashion to the belt. I take the intended figure and sculpt the cowl base and blend it into the head. Now I have head, neck, and body set as 1 piece. I make a mold including all 3 of these elements so that when I come back to cast my working model I use a sheet of plastic (saran wrap) to separate the cast piece and original model. THIS way the two are separate pieces that fit together perfectly. This will allow me to place the fabric cape inbetween these layers for our finished Keaton cowl/cape... PERFECTO!!!


 We will now get on to some simple modifications, adding armor to our stock suit. I go after the gauntlets first just since they are very simple. I take a ball of mixed Apoxie Sculpt and make two smaller sections and flatten them inplace on the forearms of the figure. I try to make them wide enough to cover half the forearm (TOP) and then make my indentions and then trim to a smooth shape. Then I follow with two small tabs on the backs of the hands and then cut to shape and add my seams for that "sporty leather" look. Also we need to add our shin guards and chest armor. These are a little trickier.
 With nearly the whole figure assembled at this point I am left only with creating the belt. For this I use that cheaper simpler Mold Making Putty which is like $12 @ Hobby Lobby. This lets you make a quick mold of an object when you don't want to build up to the whole 24+ hour letdown of pouring a bad silicone mold.
 For the head since it needs to fit to another body I actually take the head and sculpt and smooth the cowl base onto the intended figure. The only problem is we need to put our fabric underneath that cowl eventually so my process has evolved a little to account for that necessity. This process still takes one sacrificial figure but it is SO worth it to me since I like to revisit projects and try new things. This head is actually cast in a similar fashion to the belt. I take the intended figure and sculpt the cowl base and blend it into the head. Now I have head, neck, and body set as 1 piece. I make a mold including all 3 of these elements so that when I come back to cast my working model I use a sheet of plastic (saran wrap) to separate the cast piece and original model. THIS way the two are separate pieces that fit together perfectly. This will allow me to place the fabric cape inbetween these layers for our finished Keaton cowl/cape... PERFECTO!!!
 //PART 2


